Tutorial 5. Correcting distortions
Calculating transformation matrix
Unfortunately, this library does not provide the capability to correct distortion. You may want to use a Python binding of OpenCV to correct distortion.
Affine trasnformation
The Affine transformation can be obtained using a three point fitting method. Note that the dtype should be set to float32. Make sure the resulting matrix is in a 3x3 form using an append method.
[1]:
import cv2
import numpy as np

src_pts = np.array([[10, 10], [50, 10], [10, 50]], dtype=np.float32)
dst_pts = np.array([[20, 20], [60, 20], [20, 60]], dtype=np.float32)

transform = cv2.getAffineTransform(src_pts, dst_pts)
print("shape is not right: \n", transform)

transform = np.append(
    (cv2.getAffineTransform(src_pts, dst_pts)),
    [
        [0, 0, 1],
    ],
    axis=0,
)
print("now shape is right: \n", transform)
shape is not right:
 [[ 1.  0. 10.]
 [ 0.  1. 10.]]
now shape is right:
 [[ 1.  0. 10.]
 [ 0.  1. 10.]
 [ 0.  0.  1.]]
Homography
You can obtain Homography in a similar way. But you will need 4 points.
[2]:
src_pts = np.array([[10, 10], [50, 10], [10, 50], [50, 50]], dtype=np.float32)
dst_pts = np.array([[20, 20], [60, 20], [20, 60], [60, 60]], dtype=np.float32)

transform = cv2.getPerspectiveTransform(src_pts, dst_pts)
print(transform)
[[ 1.00000000e+00  1.94289029e-17  1.00000000e+01]
 [-1.99840144e-17  1.00000000e+00  1.00000000e+01]
 [-1.11022302e-18  5.55111512e-19  1.00000000e+00]]
Apply transformation matrix
You can use the “Homography” case generally, since the Affine transformation is a special case of the Homography. However, feel free to use the Affine2D class if you need explicit checks.
[3]:
import numpy as np
from pyxc.core.layer import Layer
from pyxc.core.processor.arrays import column_parser
from pyxc.core.container import Container2D
from pyxc.core.loader import ImageLoader, XYDLoader
from pyxc.transform.affine2d import Affine2D

# Read the data
EBSD = np.genfromtxt(
    "./data/SiC_in_NiSA.ctf", dtype=float, skip_header=15, delimiter="\t", names=True
)

# Initialize the layer object
layer_ebsd = Layer(
    data=column_parser(EBSD, format_string="dxydddddddd"),
    container=Container2D,
    dataloader=XYDLoader,
    transformer=Affine2D,
)

# Calculate the Affine transformation
src_pts = np.array([[10, 10], [50, 10], [10, 50]], dtype=np.float32)
dst_pts = np.array([[20, 20], [60, 20], [20, 60]], dtype=np.float32)
transform = np.append(
    (cv2.getAffineTransform(src_pts, dst_pts)),
    [
        [0, 0, 1],
    ],
    axis=0,
)

# Set transformation
layer_ebsd.transformer.transformation_matrix = transform

# Correct the distortion
layer_ebsd.apply_transformation()
You can use the “Homography” case generally, since the Affine transformation is special case of the Homography. But you cannot use the “Affine2D” class for all transformation matrices since not all Homography is Affine transformation. It means, the following code will yield an error.
[4]:
# Initialize the layer object
layer_ebsd = Layer(
    data=column_parser(EBSD, format_string="dxydddddddd"),
    container=Container2D,
    dataloader=XYDLoader,
    transformer=Affine2D,
)

# Calculate the Affine transformation
src_pts = np.array([[10, 10], [50, 10], [10, 50], [50, 50]], dtype=np.float32)
dst_pts = np.array([[20, 20], [60, 20], [20, 60], [60, 60]], dtype=np.float32)
transform = cv2.getPerspectiveTransform(src_pts, dst_pts)

# Set transformation
layer_ebsd.transformer.transformation_matrix = transform

# Correct the distortion
layer_ebsd.apply_transformation()
---------------------------------------------------------------------------
ValueError                                Traceback (most recent call last)
Cell In[4], line 15
     12 transform = cv2.getPerspectiveTransform(src_pts, dst_pts)
     14 # Set transformation
---> 15 layer_ebsd.transformer.transformation_matrix = transform
     17 # Correct the distortion
     18 layer_ebsd.apply_transformation()

File ~/checkouts/readthedocs.org/user_builds/pyxc/envs/latest/lib/python3.11/site-packages/pyxc/transform/transform_base.py:103, in MatrixTransformationBase.transformation_matrix(self, matrix)
     93 @transformation_matrix.setter
     94 def transformation_matrix(self, matrix):
     95     """
     96     Set the transformation matrix, checks matrix integrity before setting.
     97
   (...)
    101         The matrix to set as the transformation matrix.
    102     """
--> 103     self._matrix_integrity_checker(matrix)
    105     self._externally_set_transformation_matrix = matrix
    106     self.is_updated = True

File ~/checkouts/readthedocs.org/user_builds/pyxc/envs/latest/lib/python3.11/site-packages/pyxc/transform/affine2d.py:54, in Affine2D._matrix_integrity_checker(self, matrix)
     51     raise ValueError("Shape mismatch.")
     53 if not np.array_equal(matrix[2], np.array([0, 0, 1])):
---> 54     raise ValueError(
     55         "Error: The third row of the affine transformation matrix should be (0, 0, 1)."
     56     )

ValueError: Error: The third row of the affine transformation matrix should be (0, 0, 1).
Some ways to find good homography
Iterative approach
So, we are using Jupyter Notebook, right? We can easily see the code execution results iteratively. For example, you use matplotlib to see the result of homography, by manually changing dst_point.
I know, this looks little too primitive. However, due to the heterogeneity of the data this is surprisingly effective. When you get into this you will get acceptable Homography within 10 ~ 15 iterations.
You need to set good source points, such as four corner points. Since the EBSD data is rectangular, we can obtain these points using min and max methods. Make sure using x_raw and y_raw since we are dealing with source points.
[5]:
from pyxc.transform.homography import Homography
import matplotlib.pyplot as plt  # HERE!

# Initialize the layer object
layer_ebsd = Layer(
    data=column_parser(EBSD, format_string="dxydddddddd"),
    container=Container2D,
    dataloader=XYDLoader,
    transformer=Homography,
)

# Calculate the Affine transformation
x_min = np.min(layer_ebsd.container["x_raw"])
x_max = np.max(layer_ebsd.container["x_raw"])
y_min = np.min(layer_ebsd.container["y_raw"])
y_max = np.max(layer_ebsd.container["y_raw"])

src_pts = np.array(
    [[x_min, y_min], [x_max, y_min], [x_min, y_max], [x_max, y_max]], dtype=np.float32
)
Then, destination points should be properly set. This is up to you. Guess a good number! If you don’t like the result? You can always adjust the points in dst_pts.
Also, add a scatter plot to see the results.
[6]:
dst_pts = np.array(
    [[10, 10], [50, 10], [20, 50], [75, 75]], dtype=np.float32
)  # Change the value of this code
transform = cv2.getPerspectiveTransform(src_pts, dst_pts)

# Set transformation
layer_ebsd.transformer.transformation_matrix = transform

# Correct the distortion
layer_ebsd.apply_transformation()

plt.scatter(*layer_ebsd.get_xy(), c=layer_ebsd.container["Phase"], s=1)
[6]:
<matplotlib.collections.PathCollection at 0x7fadd45ef550>

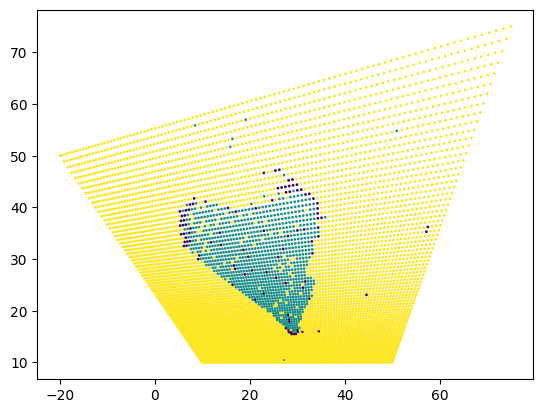
Then, for example, you can adjust the destination point by your will.
[7]:
dst_pts = np.array(
    [[10, 10], [50, 10], [-20, 50], [75, 75]], dtype=np.float32
)  # Change the value of this code
transform = cv2.getPerspectiveTransform(src_pts, dst_pts)

# Set transformation
layer_ebsd.transformer.transformation_matrix = transform

# Correct the distortion
layer_ebsd.apply_transformation()

plt.scatter(*layer_ebsd.get_xy(), c=layer_ebsd.container["Phase"], s=1)
[7]:
<matplotlib.collections.PathCollection at 0x7fadd38ff810>
Other methods
Also, you can use other image processing software to find the location of source and destination points. I have tried several image processing softwares, such as ImageJ and Huginn. Both are good to extract control points manually.